How to Stop Weeds Growing in Patios and Paving
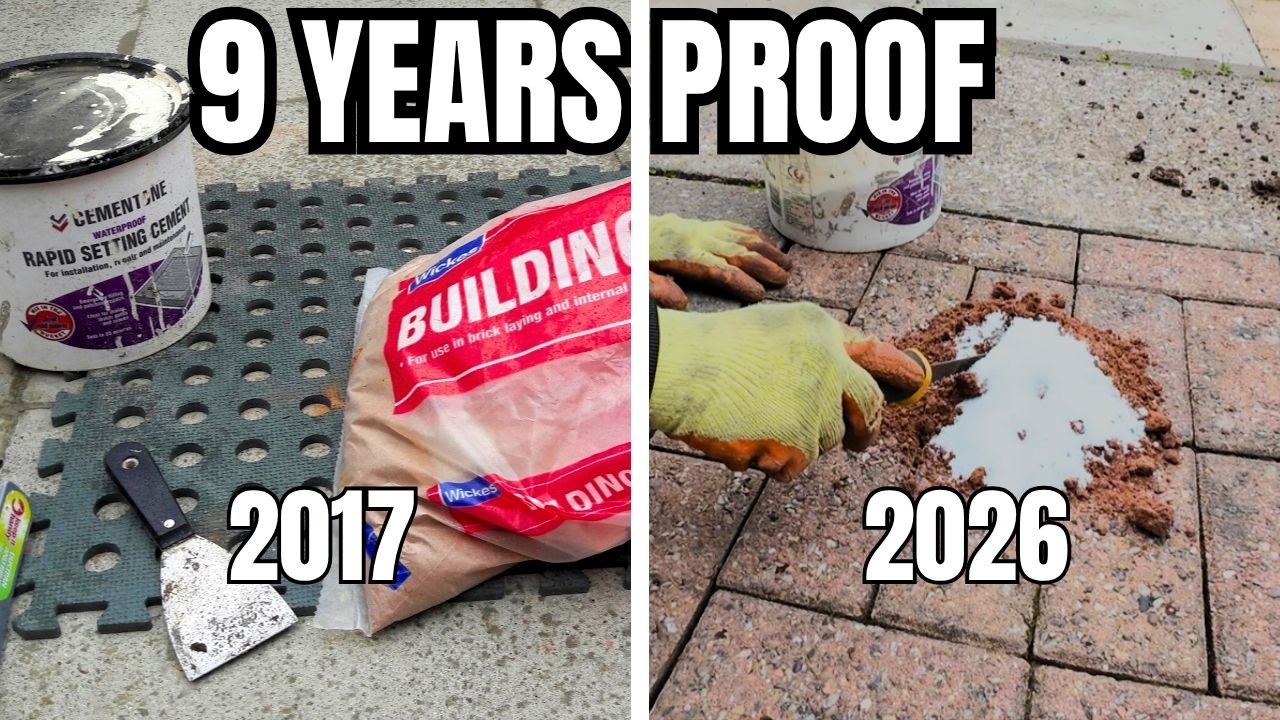
Strategic Overview: The 9-Year System
Mastering How to Stop Weeds in Patios and Paving
The core challenge in how to stop weeds in patios is that most advice focuses on “cleaning” rather than “infrastructure.” This Masterclass replaces the seasonal maintenance hustle with Operational Logic. By applying the 4:1 dry mix system documented from 2017 to 2026, we effectively “lock” the paving environment. This engineering-led approach ensures that nature cannot find a foothold, providing a permanent solution for paving weed control and reclaiming your time.
Video Proof: The 9-Year Weed-Free System
Before we get into the “how,” I want to show you the “why.” This isn’t just a theory; it is a documented journey starting in 2017 and leading up to 2026. If you’re tired of the constant maintenance hustle, watch this first. It proves that once you fix the infrastructure of your paving, nature simply can’t find a way back in.
Weeds in paving patios between patio slabs can sneak up like uninvited guests. You clean up once, and they come right back. Sound familiar? You’re not alone. Whether you’re prepping your outdoor space for guests or managing a rental property, those annoying green invaders can leave your paving looking untidy and unloved. But what if stopping weeds didn’t have to feel like a losing battle?
The Day the Weeds Took Over
I remember helping a friend prep his back garden before a family barbecue. He’d been focused on launching his landscaping side hustle, so time was tight. He figured the patio just needed a sweep an easy job, right? But when we got there, weeds had taken over. They were poking through every joint, making the place look messy. The worst part? He’d spent hours the week before clearing it out.
That moment stuck with me because it showed how small things like weeds can affect your space, your image, and even your business. Have you thought about how your outdoor areas reflect on your brand or home? You don’t need fancy equipment or endless hours. Just a few good habits, the right tools, and a bit of know-how.
Why Do Weeds Keep Coming Back? (The Science)
Weeds are stubborn because their seeds are basically everywhere blown in by wind, dropped by birds, or carried in on shoes and tools. Once they find a crack in your paving, they get comfy. Add a little sunlight and rain, and boom they’re back. Pulling them out by hand is often a temporary fix because if even a tiny fraction of the root remains, the plant will use its stored energy to regenerate within days.
In fact, most “weeds” you see aren’t coming from the soil underneath the slabs. They are growing in the dirt and organic matter that has collected in the gaps over time. This is a critical distinction. If you fill the gap with a material that doesn’t allow organic matter to settle, you kill the environment before the seed even lands. It’s like wiping crumbs off a counter but not sealing the jar they’re coming from.

How to Stop Weeds For Good
9-YEAR PROVEN EASY DRY MIX METHOD
Clear all existing weeds and loose debris.
Jet wash to ensure gaps are fully cleared out.
Wait for gaps to be 100% bone dry before proceeding.
Brush in your specific sand & cement mixture.
Final brush clean so no residue stays on top.
Allow to naturally set via ground moisture.
Deep Dive: The Sand and Cement Ratio
Let’s get technical. For 9 years, I’ve used a blend of Building Sand and Portland Cement. Why building sand? Because it’s finer than sharp sand and flows into tight cracks more easily. In 2017, I started with a simple mix. In 2026, I’ve refined this to ensure maximum longevity.
The ratio I recommend is roughly **4 parts sand to 1 part cement**. This provides enough strength to harden into a “soft mortar” that prevents seeds from taking root, but it remains brittle enough that it won’t crack your actual paving slabs as the ground shifts during the winter freeze-thaw cycles.
| Sand Type | Use | Grain Type | Purpose |
|---|---|---|---|
| Sharp Sand | Bedding | Coarse/Angular | Supports and levels the pavers |
| Kiln-Dried Sand | Jointing | Fine/Dry | Locks pavers, prevents movement |
| Washed Concrete Sand | Bedding (alt) | Medium | Smoother bedding, less common |
| Polymeric Sand | Jointing (alt) | Fine + Polymer | Long-lasting joints, weed/insect resistant |
Different Types of Sand: The Infrastructure Foundation
When it comes to block paving, sand isn’t just “dirt.” It plays a critical role both in the bedding layer (the layer that supports the pavers) and for jointing (filling the gaps between the blocks). If you choose the wrong sand, the system fails. Here’s a breakdown of the main types of sand used in paving, categorized by their specific mechanical function:
1. Bedding Sand (Screeding Sand or Sharp Sand)
This is the structural “mattress” that your pavers sit on. If this layer isn’t right, your patio will sag, and those sags create pools of water the perfect nursery for weed seeds.
Sharp Sand (Grit Sand)
- Description: Coarse, angular grains that lock together under pressure.
- Function: Provides a stable, free-draining bedding layer that doesn’t wash away easily.
- Key Properties: Excellent drainage (prevents puddles), compacts well (prevents sinking), and stops pavers from shifting.
The MrMakeStuff Choice: This is the most commonly used and reliable bedding sand for block paving.
2. Jointing Sand
This is the “glue” that keeps your driveway from falling apart. It is brushed into the gaps after the blocks are laid to lock them together.
Kiln-Dried Sand
- Description: Very fine, silica-based sand that has been heat-treated to remove all moisture.
- Function: It must be bone-dry so it flows like water into the tiny joints between paving blocks.
- Key Properties: Fills even the smallest gaps, creates interlock between blocks, and prevents weed growth by leaving no room for dirt.
Essential Logic: Essential for traditional block paving to maintain structural integrity.
3. Alternative Sands (The “High-End” Options)
While I prefer the 4:1 dry mix for value, sometimes the project requires a different approach:
- Washed Concrete Sand: Used in specific regions where sharp sand might be too “crunchy.” It’s slightly coarser than sharp sand but lacks the sharp angles. Use this if you need a slightly finer bedding layer for decorative thin slabs.
- Polymeric Sand: This is a blend of sand and chemical polymers. When you wet it, it turns into a hard rubber-like substance. It’s much more expensive, but it effectively blocks insects and resists washout in areas with heavy rain.

Tools and Tricks That Actually Work
Let’s talk about the real-world application. You don’t need to spend loads of money on expensive machinery. A few helpful tools can save your time, your money, and most importantly, your knees.
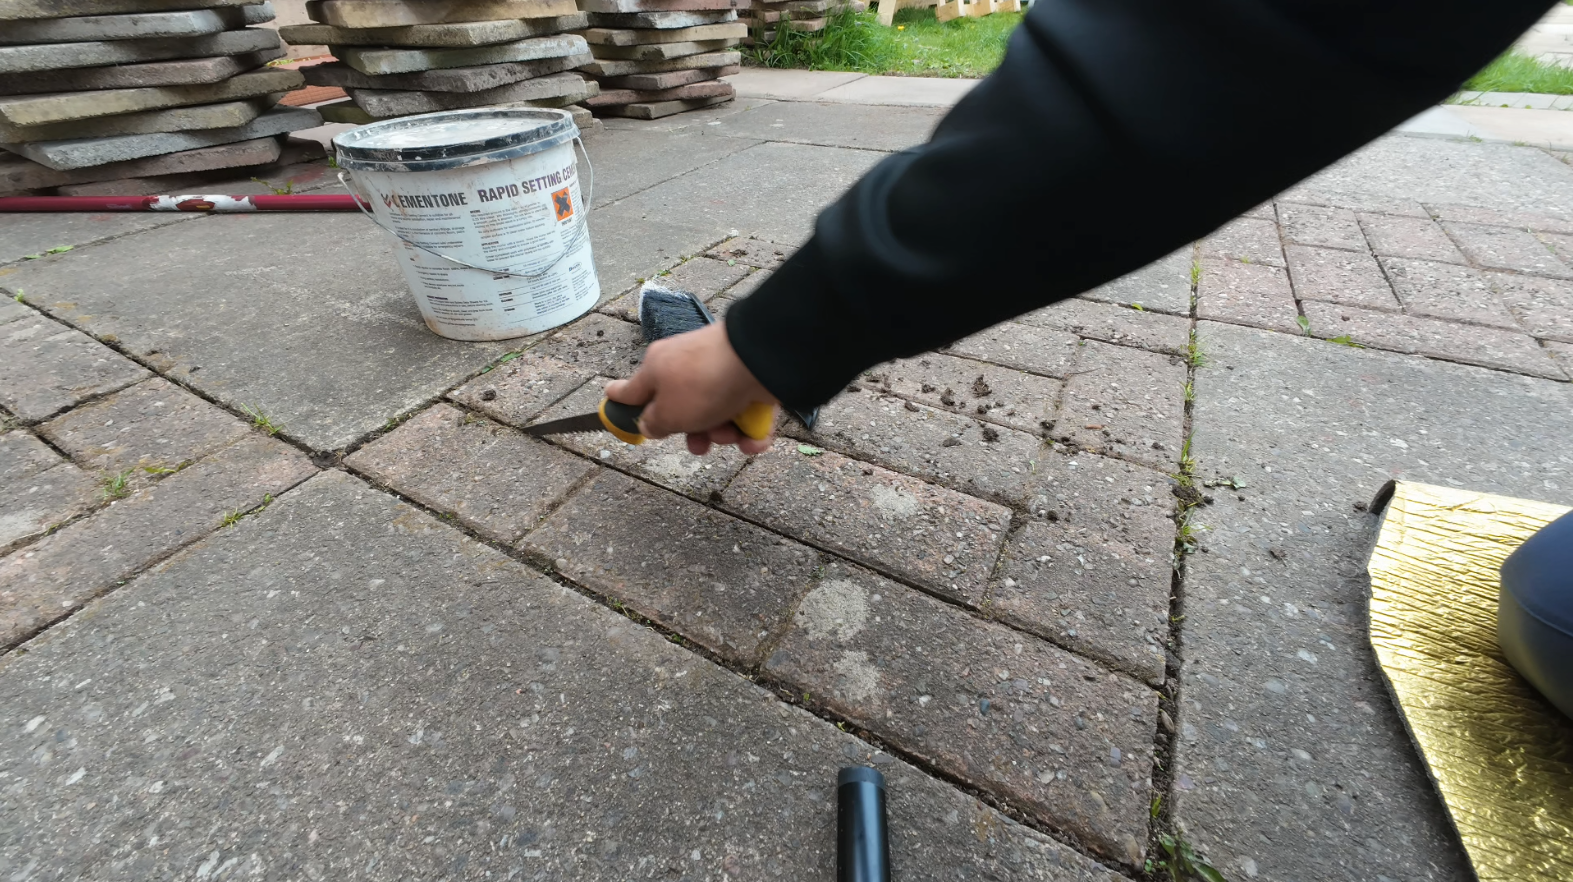
Try a Manual Weed Remover
If you’re old-school or just like a bit of quiet gardening time, a weed knife or patio weeder is your best friend. The trick here is the “Hook and Pull” method. You aren’t just scraping the surface; you are diving into the crack to pull the weed at the root. I think it’s worth the effort because it gives you a clean channel to fill with your dry mix later. Remember: Weeds in paving patios is a nightmare doing the manual work correctly once saves you a year of headaches.
Pressure Washing with Caution
A pressure washer is a double-edged sword. It can blast away years of grime in seconds, but it can also blast out the very sand that keeps your paving stable. If you use a jet wash, always aim at a 45-degree angle. Never blast directly down into the joints. If you accidentally clear out the joints (which you will), you must replace the sand once the area is dry, otherwise, your slabs will start to wobble and eventually crack.

The “Top Up” Strategy
Maintenance is easier than a total overhaul. Once your joints are clean, keep a bag of kiln-dried sand in the shed. Every few months, do a “sweep over.” This keeps the joints full. A full joint has no room for a seed. It’s cheap, easy to apply, and keeps the blocks locked in place.
Stay on Top of Maintenance: The Success Habit
Keeping patios clean and weed-free is a small detail that makes a big difference. A tidy patio says you care about the full picture. Whether it’s your home or a client’s property, visual proof is everything. I build this into my daily routine it doesn’t take long if you stay consistent.
Pro Tip for Professionals: If you are in the landscaping business, adding a “Weed Control Monthly Check-in” is a great way to stay on a client’s mind. It’s a low-effort service that provides high value. Take before-and-after photos of your own patio to show off results; nothing beats visual proof to show you walk the talk.

Common Mistakes to Avoid
1. **Applying when damp:** This is the #1 reason for failure. If the cracks are damp, the cement in your dry mix will activate instantly, sticking to the sides of the slabs before it reaches the bottom of the gap. This creates a weak “bridge” that will crack within weeks.
2. **Neglecting the Deep Clean:** If you just brush sand over old dirt, you are essentially planting a garden. You must jet wash the gaps until you see the original bedding layer or the base of the slab.
3. **The “Hose Down” Myth:** Many people want to spray water on the mix once they’ve brushed it in. Do not do this. It will cause staining on your expensive slabs. Let the natural moisture from the atmosphere and the ground do the work over 24-48 hours.
Extended FAQ: 9 Years of Proven Results
Q: Does the dry mix crack in winter?
A: Over 9 years of testing across different properties, I’ve found that minor hairline cracks can appear if the ground moves significantly. However, unlike loose sand, the “structure” of the gap remains filled. Seeds cannot find a foothold in these microscopic cracks. If a gap does open up, it takes 30 seconds to brush a little more dry mix into the area.
Q: Is this safe for pets?
A: Once the mix has set (usually 24 hours), it is as solid as any other mortar. During application, you should keep pets away as cement dust can be an irritant. Always wear a mask and gloves during the mixing phase.
Q: What about Ants?
A: Ants are the secondary enemy of a good patio. They love loose kiln-dried sand. By using a sand/cement dry mix, you create a solid barrier that ants cannot easily excavate. This prevents the “piles of sand” you often see on block paving.
Q: Can I use this on Block Paving?
A: Yes, but with a caveat. Block paving relies on “interlock” provided by kiln-dried sand. If you use a dry mix, you are effectively turning your block paving into a rigid surface. This is great for weed control, but ensure your sub-base is solid so the blocks don’t shift and crack the new joints.
Q: What is the cost difference?
A: Huge. A bag of Building Sand is roughly £34, and Cement is £6. For £40, you can do a large driveway. Compare this to “Polymeric Sand” which can cost £40 per small tub, often requiring 4-5 tubs for the same area.
Video Masterclass: Visual Evidence
Conclusion: Walking the Talk
Stopping weeds in paving patios doesn’t have to be a losing battle. With the right tools, a bit of planning, and regular upkeep, you can keep your outdoor spaces looking sharp. Whether it’s your home, a rental, or part of your growing business clean paving makes a big impression. I’ve shown you the footage from 2017 to 2026. The method works. Keep it simple, stay consistent, and weeds won’t stand a chance.