Professional Used Laptop Checklist: An Operator’s Inspection Guide.
Operator’s Briefing: Hardware Infrastructure
In our media network, hardware isn’t a luxuryit’s infrastructure. When managing a portfolio that generates 103M+ views, you cannot afford workstation failure. I use this 10-Point Operational Audit to vet second-hand gear. Below is the exact SOP (Standard Operating Procedure) I use to ensure every workstation meets our professional requirements.
Visual & Structural Inspection
Carefully inspect the chassis for dents, scratches, or cracks. On pro-sumer laptops, a corner dent often indicates a drop that could have micro-fractured the motherboard. Pay special attention to the screen and hinges; they should be firm and allow for smooth movement without “play.”

Port Connectivity Audit
In a studio environment, one dead HDMI or USB-C port ruins a multi-monitor workflow. Physically plug a device into every jack (USB, HDMI, Ethernet, headphone). Ensure the charging port doesn’t require “wiggling” the cable to maintain a connection.
Memory (RAM) Stress Test
Faulty memory causes blue screens during video rendering. Run the Windows Memory Diagnostic Tool to ensure the RAM modules are 100% stable. Type this in the Command Prompt:
mdsched

System Specification Verification
Never trust the sticker. Open Task Manager to check the actual CPU, Memory (RAM), and SSD capacity. This confirms that the internal hardware matches the specifications you purchased.
Data Integrity & Factory Reset
Ensure the laptop has been factory reset to default settings. This is a security requirement to ensure no previous data remains on the device and it is clean for your new production environment.
Keyboard Responsiveness
Open a text editor (Notepad) and strike every single key. Test “Shift,” “Ctrl,” and “Space” keys for “mushiness” or lack of response, which indicates liquid damage or debris.
Speaker & Audio Output
Play some music to test the speakers. I recommend a test track to check for crackling at high volumes while you continue the audit.
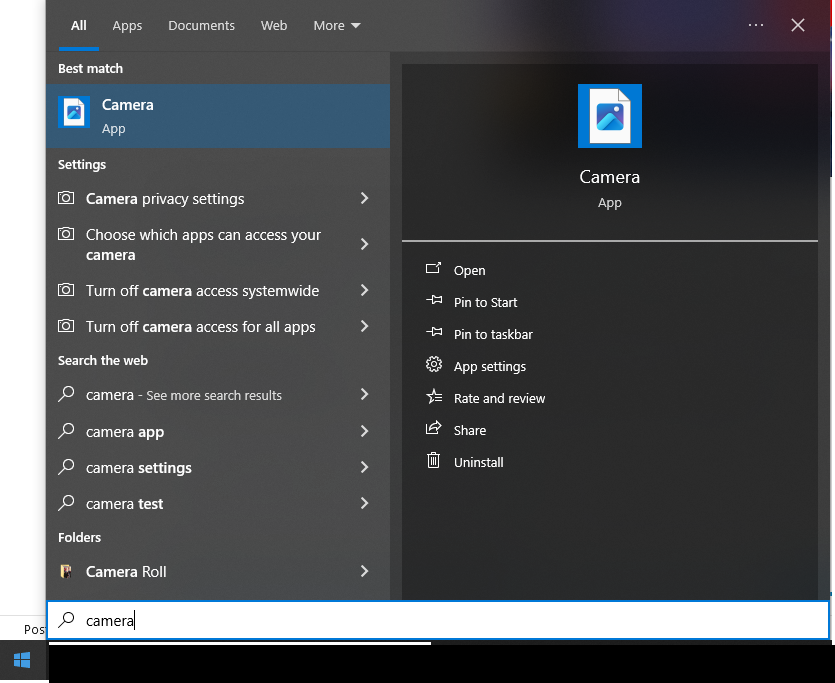
Integrated Media (Webcam & Mic)
Type “Camera” in the Windows search bar to verify the integrated lens quality and record a short clip to check the microphone’s clarity. Vital for remote creative collaboration.
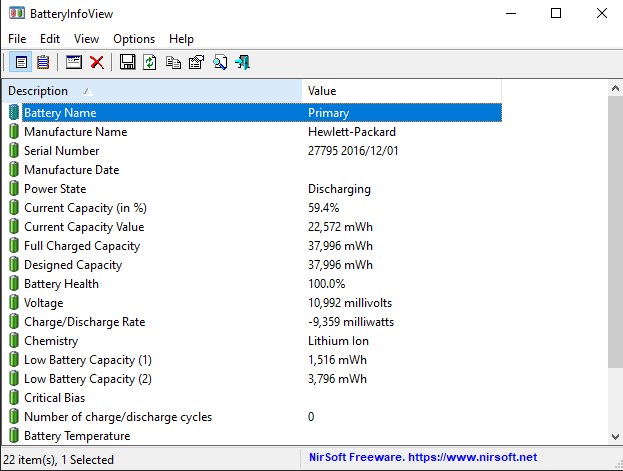
Battery Health & Cycle Analysis
Batteries are consumables. Check the “Cycle Count” by running this command as Administrator:
powercfg /batteryreport /output "C:\battery_report.html"
Alternatively, use NirSoft’s Battery Information View for a detailed health report.
Display Precision & GPU Check
For color-critical work, use the Dead Pixel Test to ensure the panel is perfect. Finally, verify the GPU/video settings in Task Manager to confirm graphics processing power.